
A few weeks ago, I was finally able to upgrade my Internet connection from a Starlink 100-200 Mbps (with an ADLS2 backup) to a 8 Gbps up/down Fiber connection with the Free Ultra box offer. By doing so, I decided also to revisit my internal network as my setup has been growing organically in the past years (with multiple switches, IoT and mini-PC connected devices...) and realized that my internal network, while already using some 10 Gbps ethernet cables, was not really used at its full potential.
Moreover, the Freebox Ultra is making IPv6 mandatory (no wonder why the adoption of IPv6 in France is probably the highest in the world!) but I never really paid attention to IPv6 until now, as I was always relying on the good old IPv4. But reading further, I discovered that IPv6 is allowing all your devices to be accessible from Internet while the Freebox does not activate any firewall by default... I could use the very rudimentary builtin firewall on the Freebox (a checkbox enable/disable) but thought that it would be nice to understand what is really happening under the hood, and so, why not also bringing my own firewall to this setup?
So, this post is a small retrospective of the changes I have made to my home network setup in the past weeks:
- Some prerequisites for a 10 Gbps home network
- Select a mini-PC suited for building my own 10 Gbps Firewall
- Install and configure the open-source OPNsense Firewall
- Tune OPNsense performance
- Install tailscale to safely access to my internal network from anywhere
Preparing my home network for 10 Gbps
The Freebox comes with:
- 1 x WAN incoming Fiber SFP+ connector
- 1 x SFP+ 10 Gbps connector for connecting to your 10 Gbps LAN switches/home network
- 4 x 2.5 Gbps ethernet ports.
First time I was getting an hardware with such SFP+ ports. I discovered that SFP+ connectors are the most common way that will interconnect your multi-gigabit appliances. There are of course some appliances with 10 Gbe ethernet ports, but they are far less common than these SFP+ ports.
What does that mean to have to use these SFP+ ports? If you want to make sure that your whole network setup is able to benefit from the extra bandwidth, you will have to use such SFP+ connectors to connect to other appliances (mostly switches but also, your main PC!)
In my home/office computer room, I have around 20+ devices to connect including several computers, gaming consoles, a NAS, a WIFI 6e main mesh, a camera powered through a POE, a TV, a printer, and ethernet cables coming from other parts of the house...
So, in order to upgrade my network, I had to buy:
- Several SFP+ 10 Gbps cable (With different lengths: 1 meter, 2/3 meters)
- Several switches:
- A Zyxel XGS1250-12, which comes with one SFP+ port (again, to interconnect your 10 Gbps network), 3 x 2.5/10 Gbps ports and 8 x 1 Gbps ports (These are useful for devices that don't need more than that). Don't forget to change the password of this device (It is a managed switch, meaning that it comes with HTTP/HTML admin pages), specially in a IPv6 environment!
- A Yuanley 4 x 2.5G + 2 x SFP+/10G and a Yuanley 10 x 2.5G + 1 x SFP+/10G
- One PCIExpressx8 SFP+ 10 Gbps card for my personal PC that I will connect directly to the router, as it is probably the PC at home that requires most of the bandwidth from time to time 😅
I have to confess that I haven't equipped all the parts of my home to 10 Gbps, because I found it difficult to find small 10 Gbps switches. I have several 1 Gbps switches installed in the house, so didn't want to change them for now. The best you will be able to find these days are SFP+/10G with several 2.5 Gbps ethernet ports, which I concede, should be vastly enough for the other devices in the house, but jumping from a shared 100 Mbps to an almost 1 Gbps per device and my family was already fully happy about the change.
Selecting a 10 Gbps firewall appliance for less than 500€

Initially, without knowing much about this area, I thought of buying a firewall bundle hardware + software. For example there are really good OPNsense appliances from Deciso or Pfsense+ appliances from Netgate, but I found quickly that for my requirements, I would have to purchase some $800+ appliance. Both are using their own OSS Firewall OPNsense and Pfsense (OPNsense being a fork of Pfsense, Pfsense being a fork of another older project). They are developed on the FreeBSD Unix system which is coming with a solid reputation as a safe/secure Unix system.
I feel lucky and love to live at a time where it's incredibly accessible and easy to install your own Firewall OS! 💖
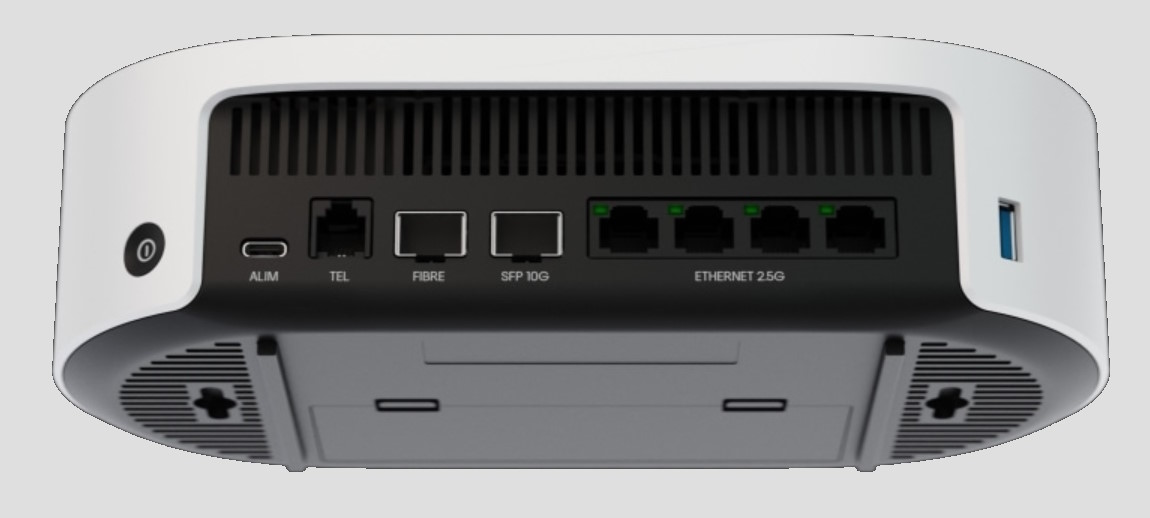
So then, I tried to look for a mini-pc that could provide the CPU power and all the SFP+ ports (as I wanted to maximize direct connections, instead of chaining multiple SFP+ switches), with a fanless design. Stumble on this nice review of "The Everything Fanless Home Server Firewall Router and NAS Appliance" for the Qotom Router PC Q20331G9S10. I ordered it from AliExpress (It was not available on Amazon in my place, but it seems to be available in the US), and selected an Intel Atom C3758R, with 16GB RAM and a 256GB M2 drive, with the shipping cost, it was slightly above 500€.
This router PC is only coming with a VGA output (!), so I still had to order a small and cheap VGA to HDMI converter. 🙈
But, in then end, that's a pretty nice PC, considering that most firewall appliances are coming with similar CPU/HW specs. But, as we will see in the following section, what you get by using an off-the-shelf HW firewall is that you don't need to deal with installing and setup-ing correctly the whole firewall stack! For me, I wanted to go through this adventure from the ground up, and I don't regret it: it was fun and I learned quite a lot!
Installing OPNsense
Once I ordered the Qotom PC, I had to wait for 2 weeks to get it delivered. In the meantime, I decided to practice a bit by installing OPNsense on a spare mini-pc I had around that happened to have 2 x 1 Gbps Ethernet ports.
The installation process is pretty smooth. Go to OPNsense download, select your image (for me, amd64 + vga) and burn it to a USB stick with e.g Rufus. Then you can follow the installation instructions in their documentation (which is overall, pretty good).
During the setup, you need to select the interface that will be the WAN port (connected to my Freebox SFP+ "LAN" port) and optionally the LAN port. Be careful that if you select the LAN port, you will have to connect a machine to this port in order to be able to connect the OPNsense Web interface, as the interface won't be accessible from the WAN port once the LAN is enabled. But in my small experience, it was easier to first connect through the WAN port without configuring a LAN port, and configure the LAN port from the Web interface and apply the changes at the very end.
The SFP+ 10 Gbps interfaces are named ix0, ix1, ix2, ix3, and I had to try and fail the SFP+ ports to see which one is at the back panel of the qotom. The other regular 2.5 Gbps ethernet ports are named igc0, igc1, igc2, igc3, igc4.
Here is a small ASCII diagram of the back panel with the ix and igc ports:
---- ix -----    ------ igc ------
[  0 ] [  2 ]    [ 2 ] [ 3 ] [ 4 ]
[  1 ] [  3 ]    [ 1 ] [ 0 ]
 SFP+   SFP+      Ethernet ports
I plugged the WAN port ix0 to the available Freebox SFP+ LAN port.
I have to say that the web interface of OPNSense delivers successfully its mission statement:
Give users, developers and businesses a friendly, stable and transparent environment. Make OPNsense the most widely used open source security platform. The project’s name is derived from open and sense and stands for: “Open (source) makes sense.”
This is the nice dashboard of my OPNsense setup once I had configured everything and added relevant widgets to it:

Configuring OPNsense
During the installation process, when you select the WAN port, OPNsense will use by default DHCP to configure this port. By default, the Freebox is configured as a router with DHCP enabled, so it will make the router accessible from the LAN on the Freebox. Once we have transferred all the Freebox LAN to the router, We will later switch the Freebox to act as a bridge instead (to avoid having double routers and so to avoid double NAT).
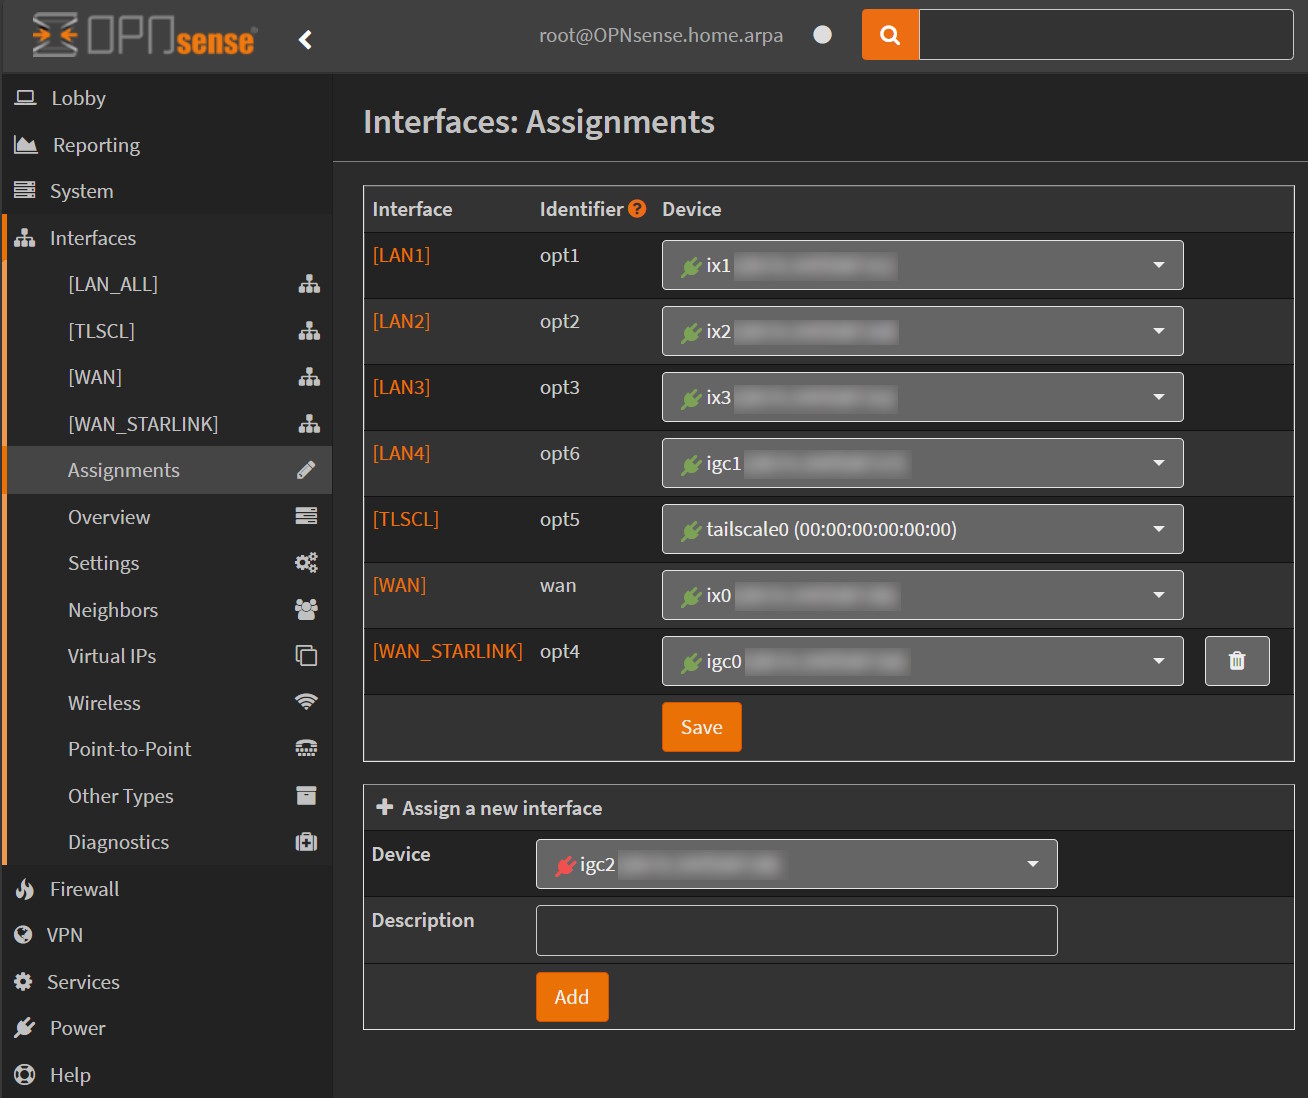
1. Assigning interfaces
In OPNsense, the first thing to do is to assign interfaces. Go to Interfaces/Assignments and I configured my interfaces like this on the Qotom router:
ix0⇒ WAN, already configured during the installation setupix1⇒ LAN1, connected to one of my 10 Gbps switchix2⇒ LAN2, connected to one of my 10 Gbps switchix3⇒ LAN3, connected to my PC directlyigc1⇒ LAN4, connected to the Freebox pop TV playerigc0⇒ WAN_STARLINK (for the backup)
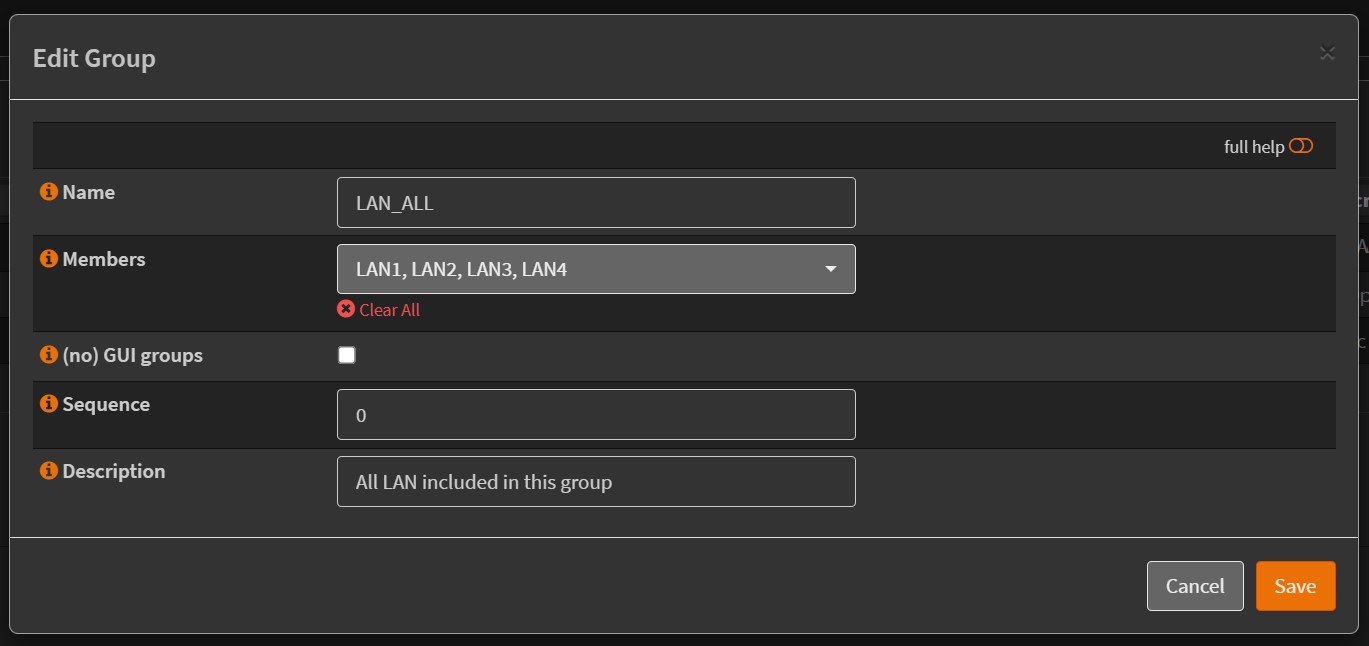
To simplify the configuration of Firewall rules, I also created a group of all my LAN interfaces in Firewall/Groups, added a LAN_ALL:
2. Configure Freebox prefix delegation
The following assumes that you have already requested a fixed IP address for the Freebox on your account at https://free.fr in
Ma Freebox / Demander une adresse IP fixe V4 full-stack(you will get also an IPv6 address from there)
So before we start, we need to get the IPv6 local address of the OPNsense WAN interface (connected to the SFP+ port on the Freebox). If you go to OPNSense Interfaces/Overview you will get the list of all the interfaces (LAN are not yet configured):
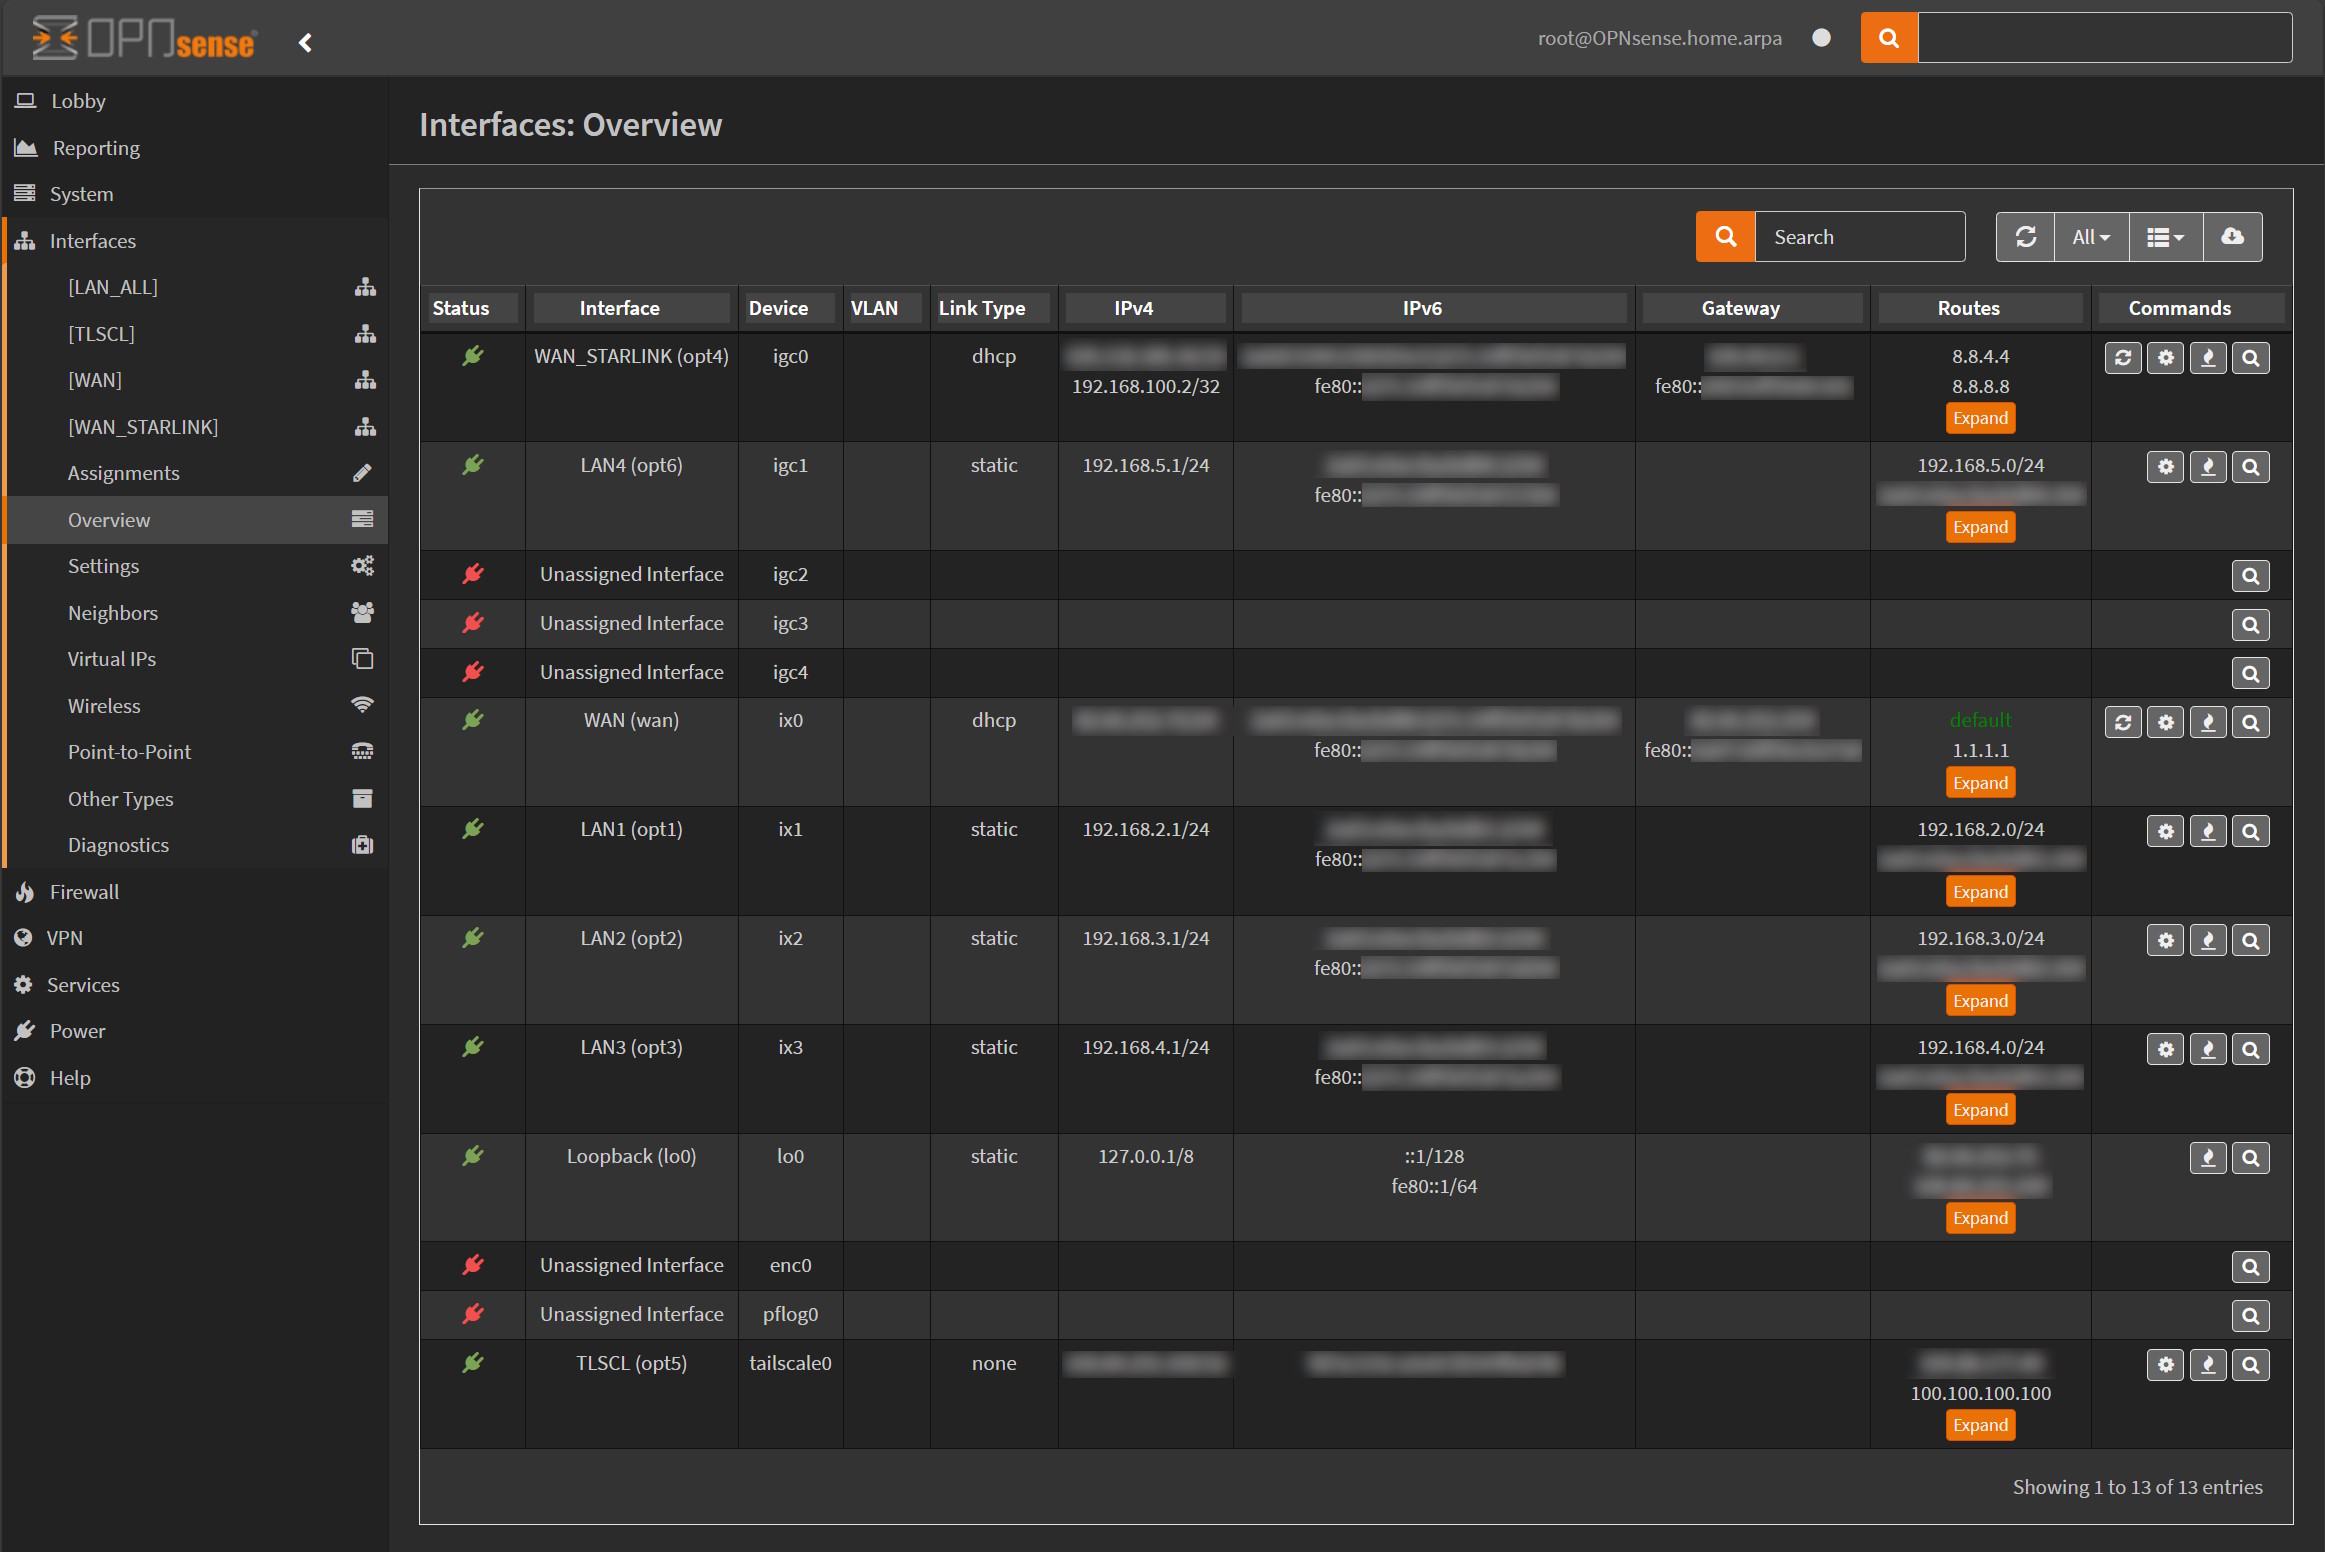
For your WAN interface you should see a local IPv6 address in the column IPv6 starting with fe80:xxxx:yyyy:zzzz:wwww/64. Take a note of this address.
Then, I connected to the admin page of my freebox via https://mafreebox.freebox.fr/ (for which the DNS is bound to the local address 212.27.38.253), Configuration IPv6, and you should see the following page:
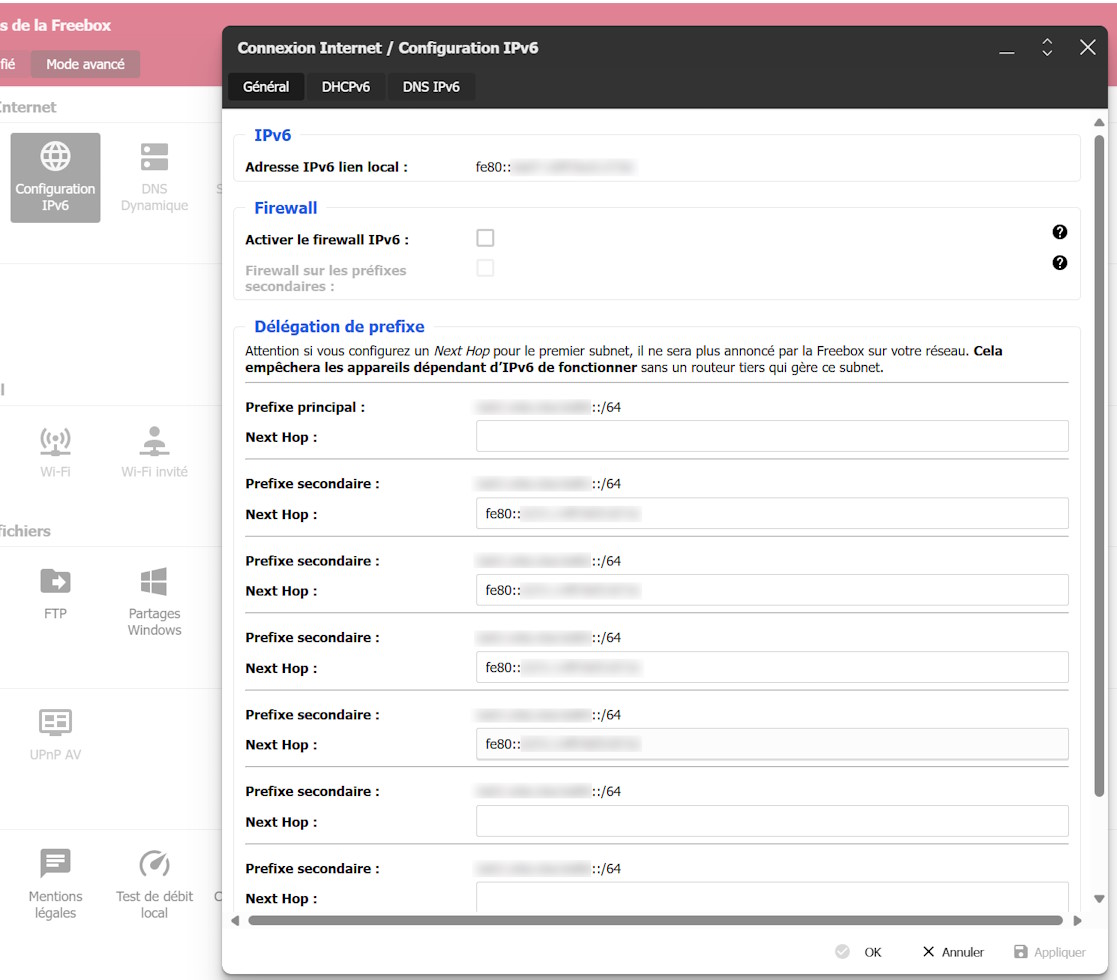
Here we need to tell the Freebox that we will delegate the public IPv6 prefix for the 3 LAN interfaces that we have connected to OPNsense/Qotom router. In the Next Hop for the 3 secondary prefixes: put the local IPv6 address of the OPNsense WAN (the above fe80:xxxx:yyyy:zzzz:wwww/64). We will keep the Prefixe principal blank, as it is used by the Freebox to assign the DHCP address to our OPNsense WAN interface (Note that it is not really DHCPv6 that we are using here but we are actually relying on Stateless address autoconfiguration (SLAAC) for IPv6).
Doing these changes on the Freebox are harmless as the prefixes that we are configuring haven't been used yet.
For each of the IPv6 delegation prefixes configured, take a note also of the public IPv6 addresses (not the fe80 one), as we will use them to configure the IPv6 part of the LAN interfaces in the following section.
3. Configure LAN interfaces
Then we need to configure each LAN interfaces by assigning a static IPv4 and IPv6 address.
3.1 IP Addresses for LAN
In OPNsense, go to Interfaces / LAN_ALL / LAN1 (assuming that you have created a group, otherwise, it's directly LAN1).
For each interface, you should configure:
IPv4 Configuration Type=Static IPv4IPv6 Configuration Type=Static IPv6IPv4 address=192.168.2.1,Prefix=24(then192.168.3.1for LAN2,192.168.4.1for LAN3...). Don't forget the Prefix here (by default it is 32 meaning directly an address and not a subnet). What is important here is to select a subnet that is not going to conflict with the subnet provided by the Freebox (default is192.168.1.0/24)IPv6 address=aaaa:bbbb:cccc:dddd::2,Prefix=64(Important!), the IPv6 address here is the public address that you noted from the delegation prefix from the Freebox configuration IPv6 panel.
Save changes without applying them, otherwise you won't be able to configure OPNsense through your WAN interface.
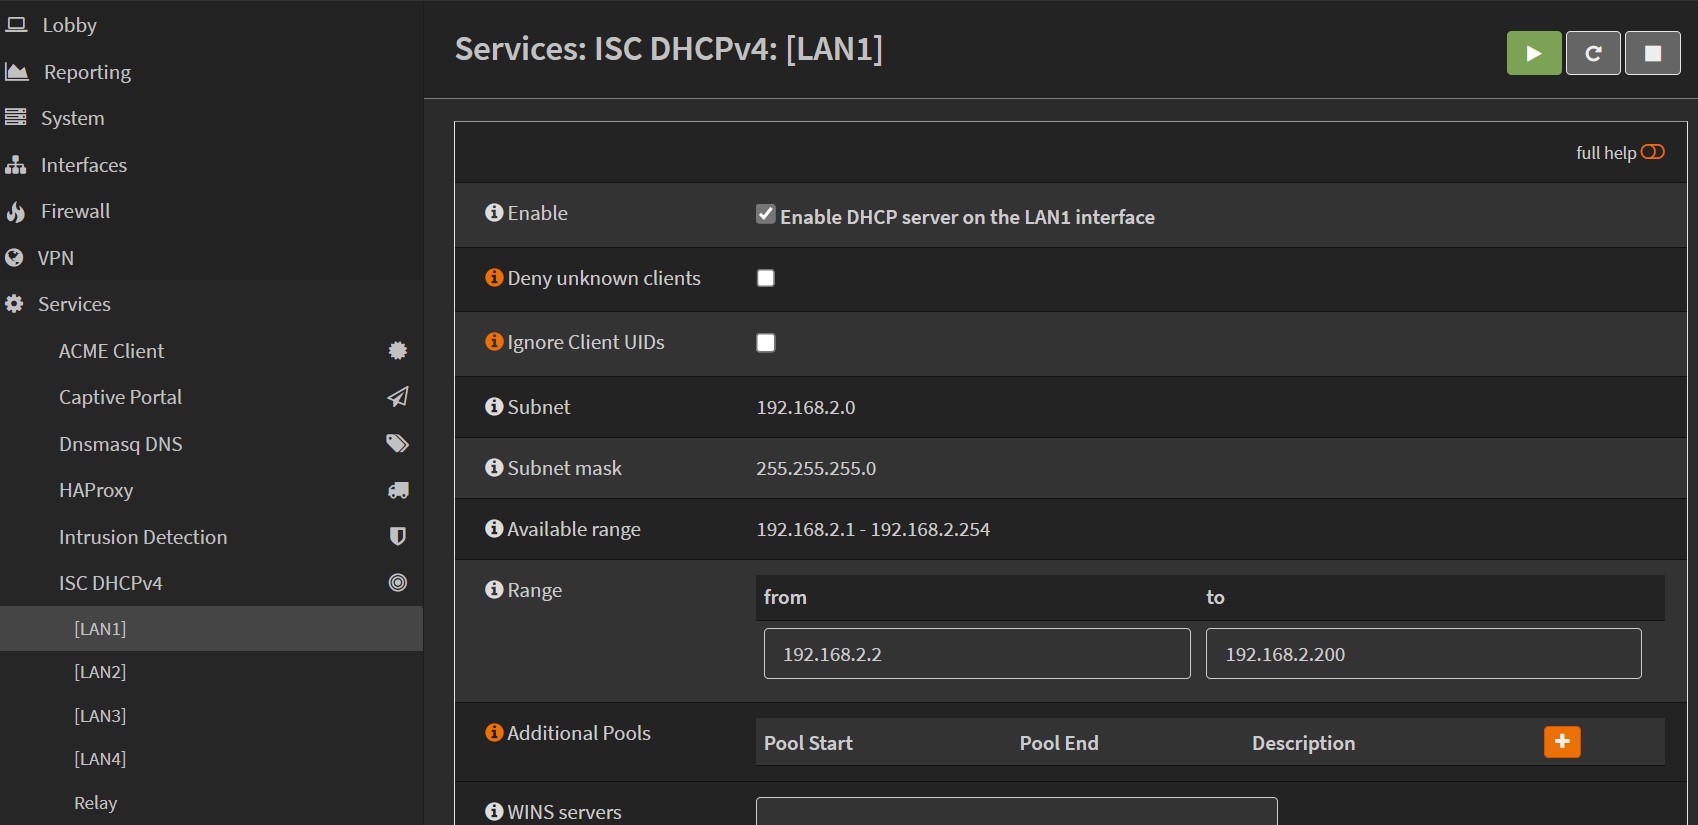
3.2 Configure DHCP
We should then enable DHCPv4 for each of these LAN interfaces, go to OPNsense Services/ISC DHCPv4 and select each LAN1/LAN2...etc. And configure them with the address range selected when configuring the interfaces. For example, I selected a range from 192.168.2.2 to 192.168.2.100
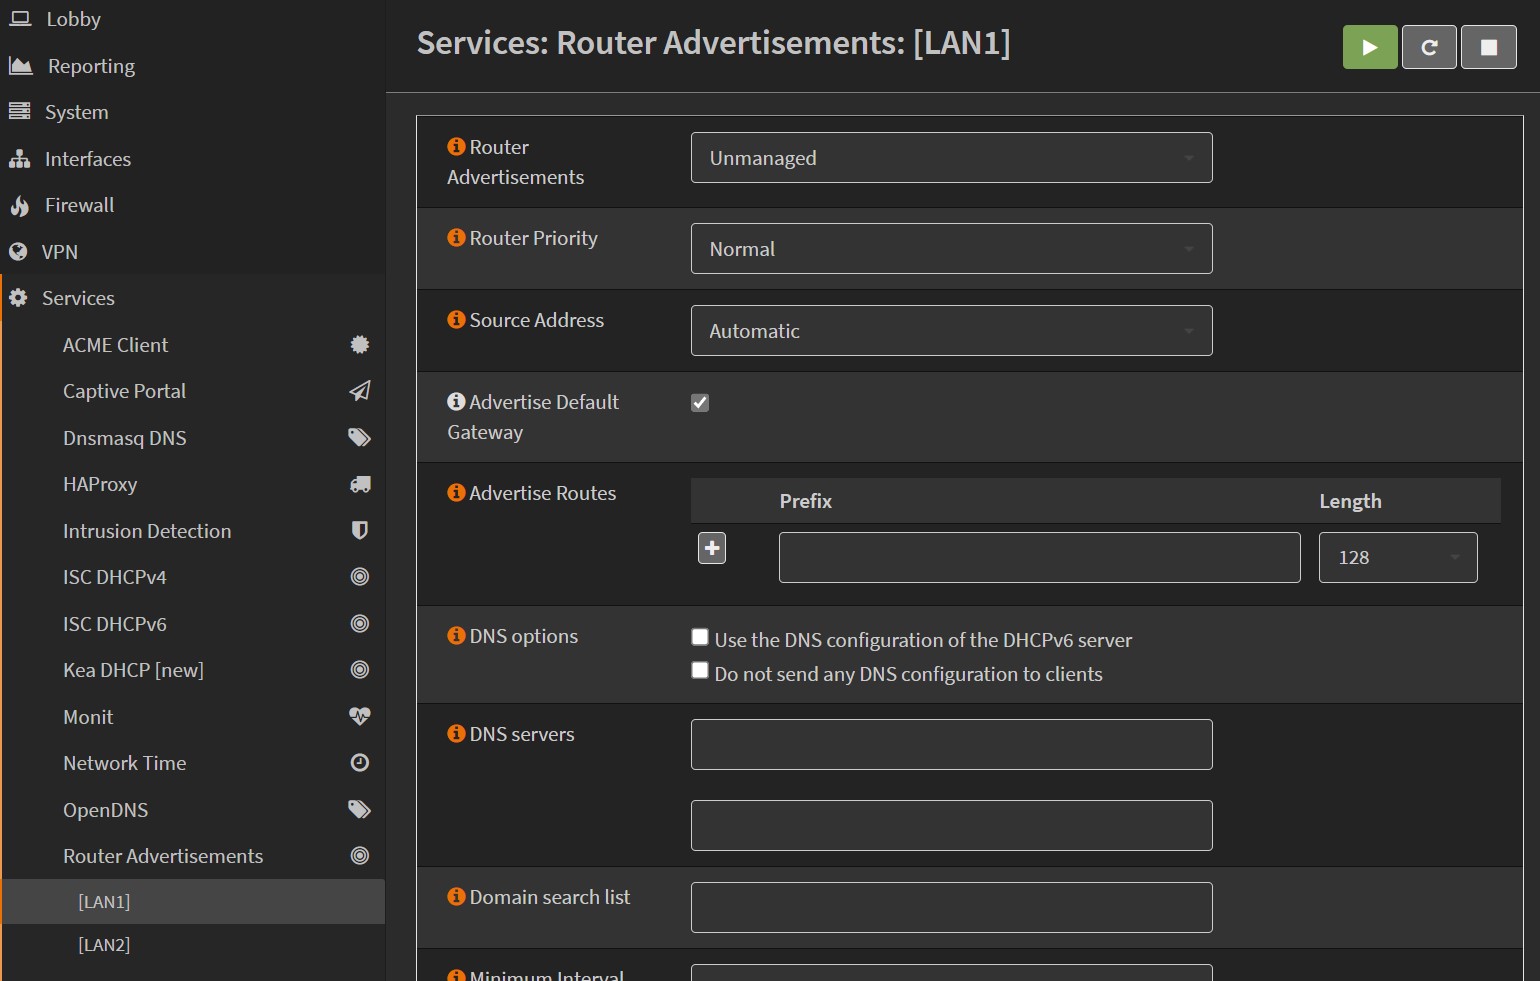
3.2 Configure Router Advertisements
Then for each LAN, we need to tell how they are going to advertise their routes. We will use Unmanaged router advertisement for each LAN interfaces. Save without applying.
3.3 Add Firewall LAN_ALL rules
Here we need to tell the Firewall that all connections coming from any LAN can pass.
Add a firewall rule, select LAN_ALL net Source dropdown, save.
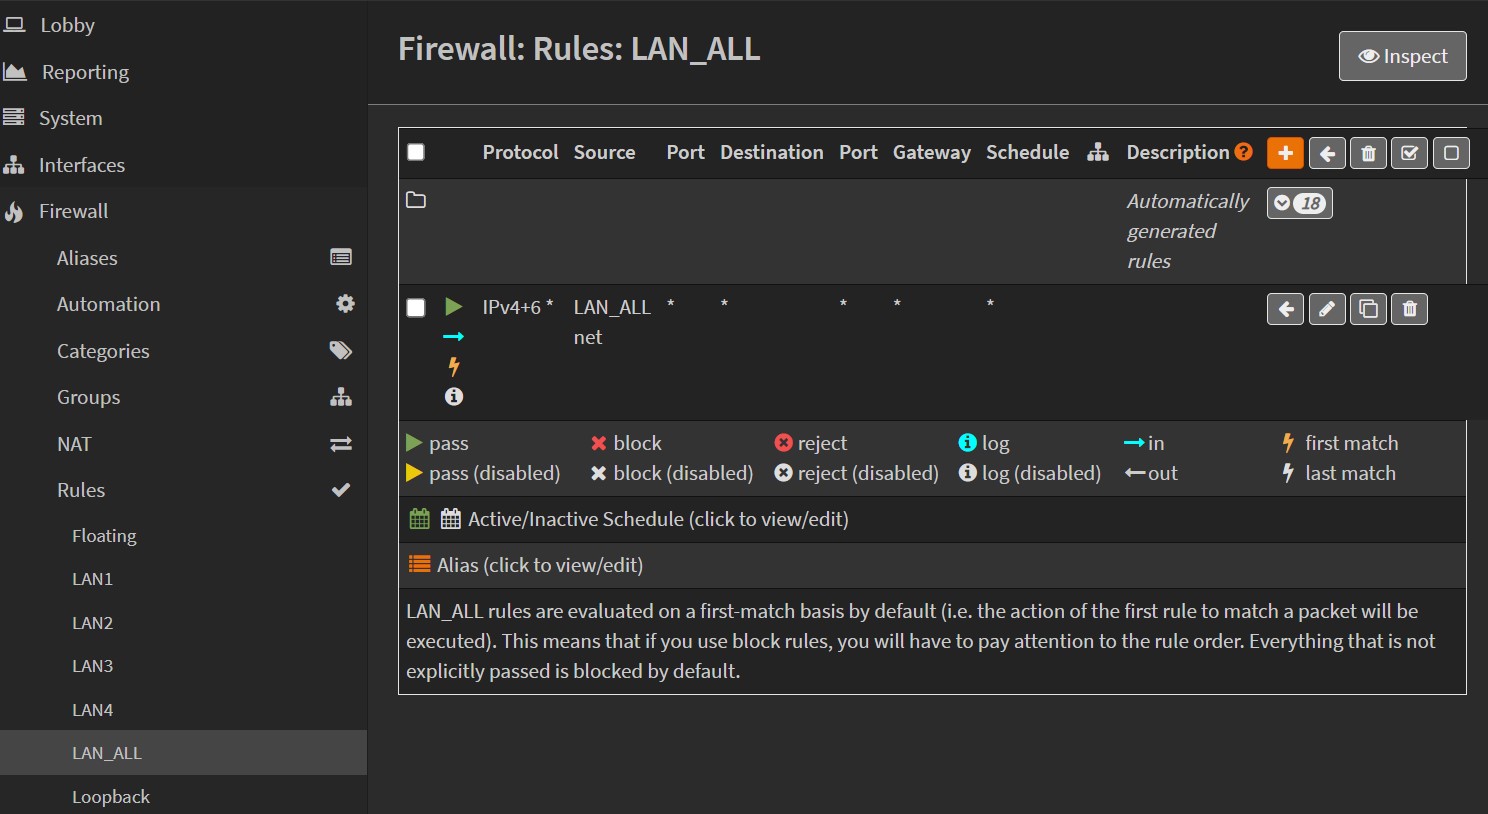
Note that the fact that we created a group LAN_ALL for our LANs makes this configuration more straightforward, otherwise we would have to repeat this step for each LAN interfaces!
At this point, you should be able to apply the changes to the Firewall, it will save the config on the disk and restart the different services. If you were connected from the LAN of the freebox to access OPNsense WAN, you won't be able to do it anymore! You will have to plug at least your main PC to one of the OPNsense LAN interface to interact again with the OPNsense web admin UI.
4. Other misc configurations
I won't go into every details of my particular setup, but OPNsense is making things super easy to configure. For example, I was able to easily configure multiple WAN with failover (as I'm still keeping my WAN starlink interface just in case).
You might want to play with VLAN as well. For example, ideally, I would have preferred to isolate some of the IoT devices on a separate VLAN without giving them an access to my internal network, but I couldn't because my TP-Link Deco X75-Pro Wifi 6E is not supporting assigning VLAN tag id. What a disappointment!
Though I will detail later in this post an important configuration I made: Adding a VPN network with tailscale.
5. Switching the Freebox to bridge mode
Once the WAN and the LAN interfaces have been configured, we can switch the Freebox to a bridge mode. Go to Paramètres de la Freebox (advanced mode)/Mode réseau select Bridge from the dropdown.
You should reboot the Freebox from there.
You can then test your Firewall and the different machines with various port scanners to double check that everything is working fine.
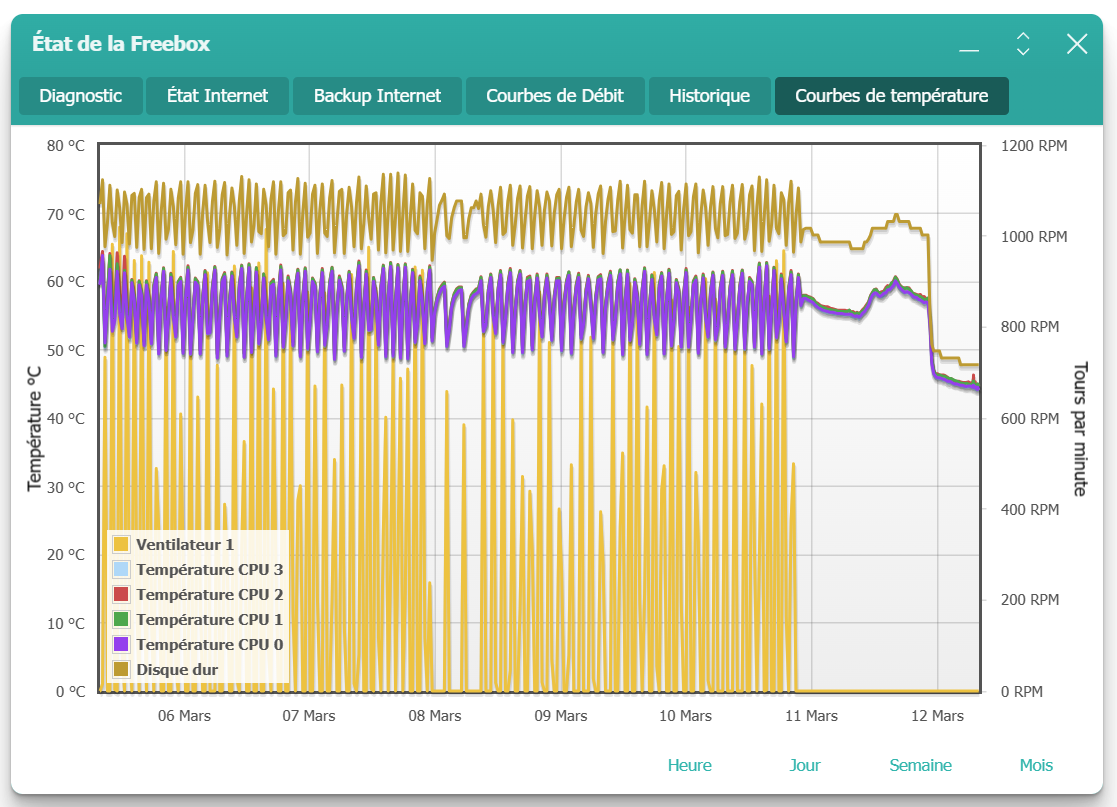
An interesting effect of moving the router to another box (with a more advanced firewall!) is that the temperature in the Freebox got extremely stable. You can see in the following picture the day I turned on OPNsense. The yellow chart at the bottom is the fan of the Freebox. After using my own router, it doesn't trigger anymore. The drop at the end was a tentative to install a small fan under the Freebox, and it helped to drop the temperature by almost 20 ℃. I might enable it during the summer!
Tuning OPNsense performance for 10 Gbps
I was initially planning to have more details here, as at the beginning of my installation, I discovered that I was not able to reach the same raw throughput on a single port.
On the Freebox, you have access to some URL that will fake returning big files (e.g 1 GB) that you can try:
$ curl -o NUL http://mafreebox.freebox.fr:8095/fixed/1G
And you should get something like this:
  % Total    % Received % Xferd  Average Speed   Time    Time     Time  Current
                                 Dload  Upload   Total   Spent    Left  Speed
100 1024M  100 1024M    0     0   299M      0  0:00:03  0:00:03 --:--:--  299M
Previously, when connected directly to the Freebox with a SFP+ cable from my PC, I could achieve 1GB download from a single port. It turns out that going through a soft firewall/router on a single port with a packet filter layer will necessarily induce a loss in pure raw performance.
If you install iperf on OPNsense (via System/Firmware/Plugins) and then go to Interfaces/Diagnostics/iperf (after a page refresh) to launch an iperf session, get the port to use after selecting the correct LAN interface!
iperf3.exe -p PASTE_THE_PORT_HERE_RETURNED_BY_OPNSENSE_IPERF -c 192.168.4.1 -P 32

- - - - - - - - - - - - - - - - - - - - - - - - -
[ ID] Interval           Transfer     Bandwidth
[SUM]   0.00-10.00  sec  9.62 GBytes  8.26 Gbits/sec                  sender
[SUM]   0.00-10.00  sec  9.49 GBytes  8.15 Gbits/sec                  receiver
I have tried to collect some settings from various place on internet:
If you connect via SSH to your OPNsense (you need to enable it for a user), you can get configurable values with the sysctl command.
For example:
$ sysctl net.inet.tcp.tso
net.inet.tcp.tso: 0
In OPNsense, you should go directly to System / Settings / Tunnable and you can add tunnable values directly from there.
For my config, I end up with the following tunnables:
| Tunnable Name | Value |
|---|---|
kern.ipc.maxsockbuf |
16777216 |
kern.random.fortuna.minpoolsize |
128 |
net.inet.icmp.drop_redirect |
1 |
net.inet.rss.enabled |
1 |
net.inet.tcp.abc_l_var |
42 |
net.inet.tcp.minmss |
536 |
net.inet.tcp.mssdflt |
1240 |
net.inet.tcp.recvbuf_max |
4194304 |
net.inet.tcp.sendbuf_max |
4194304 |
net.inet.tcp.soreceive_stream |
1 |
net.inet.tcp.tso |
0 |
net.isr.bindthreads |
1 |
net.isr.defaultqlimit |
2048 |
net.isr.dispatch |
deferred |
net.isr.maxthreads |
-1 |
net.pf.source_nodes_hashsize |
1048576 |
net.inet.ip.intr_queue_maxlen |
3000 |
hw.ix.flow_control |
0 |
I'm not an expert in making good diagnostics for these network settings (and If I wanted to do it properly, I would have to change one setting at a time, reboot, run iperf...), so I can't tell which one exactly was able to bring the performance from 6 Gbps to 8 Gbps but it is worth spending some time tweaking these values. If anyone is using a similar Qotom HW and is able to achieve better performance, I would be interested to know more about it!
If the CPU of the OPNsense router was maybe more powerful, it would most likely improve the raw performance on a single port accordingly.
Creating a VPN to your home network with tailscale
I have a NAS connected to a camera and in the past, I had to create a NAT port forward rule on my internet box + setup dynamic DNS + setup 2FA for my NAS. And that was just for one service!
Using tailscale removes the need to open any ports (more about this in How Tailscale works?) and you can easily create your own home VPN network, accessible from anywhere and giving access to your entire home internal work. You have to decide whether tailscale is safe/trustable enough to synchronize private keys between your machines.
For installing tailscale on OPNsense, I have followed the official guide Using OPNsense with Tailscale
I had to tweak it a bit. For example, go122 (the go toolchain version required by tailscale), was not installed by default, so you have to cd /usr/ports/lang/go122/ and issue a make install from there in order to have a go toolchain compiled.
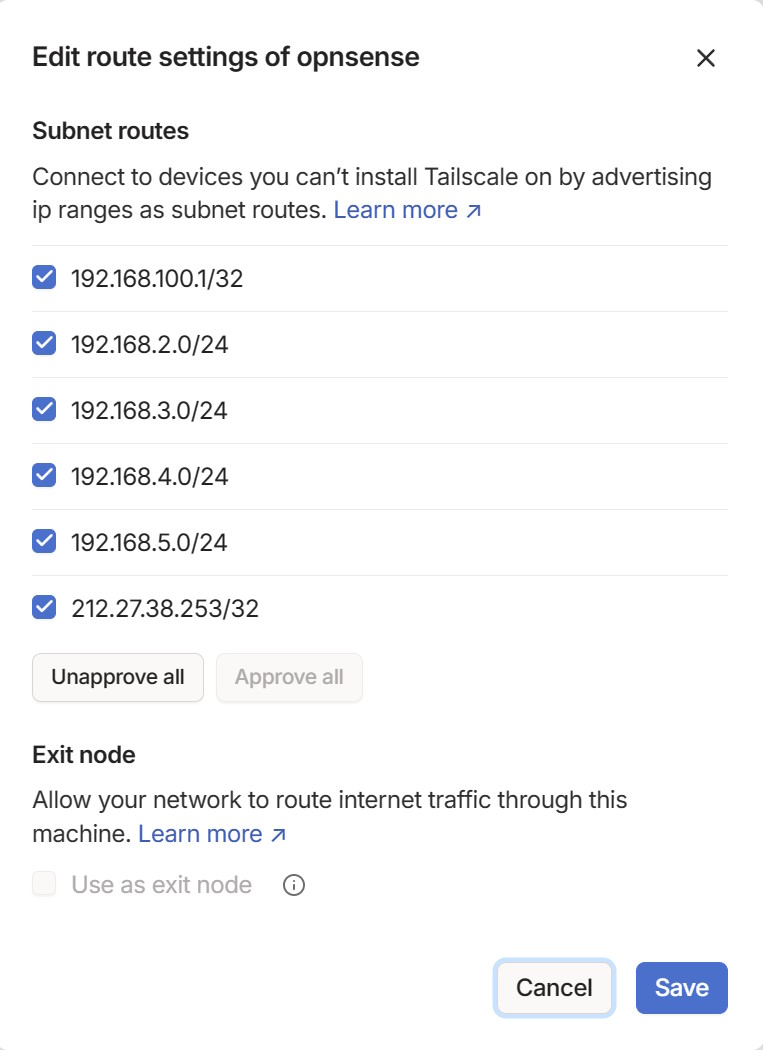
Depending on your network, you might want add different networks accessible from tailscale. I configured mine with my setup (in a SSH prompt on the OPNsense box):
tailscale up --accept-dns=false --advertise-routes=192.168.2.0/24,192.168.3.0/24,192.168.4.0/24,192.168.5.0/24,212.27.38.253/32,192.168.100.1/32
The 212.27.38.253 is the address of my Freebox, the 192.168.100.1 is the address of the Starlink bridge interface.
Things are then super easy to configure from the tailscale dashboard:
You should enable the route from your OPNsense node:
From the official guide, I have used the setup Static NAT port mapping by adding a manual NAT rule (you need to change your NAT from automatic to hybrid).
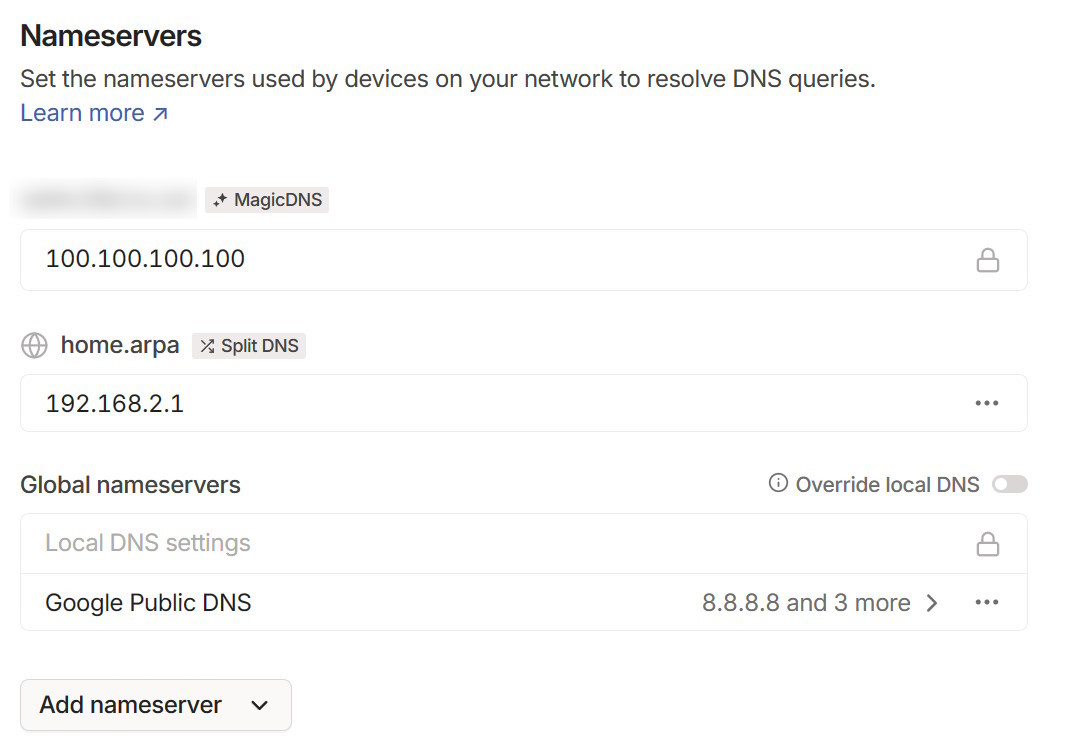
I have enabled Unbound DNS on my OPNsense in Services / Unbound DNS / General to have all my machines available through the recommended home.arpa domain suffix so that I could also setup the DNS accessible from tailscale when connecting to my network. In the DNS section on tailscale, you can add your own split DNS (the unbound DNS from OPNsense for your internal network). Don't forget to update your OPNsense settings in System / Settings / General and update the domain to use home.arpa.
And that's it! By activating Tailscale on my phone, I can connect very easily to my local network and it makes my network more secure, as I don't have to open forward ports on my firewall anymore.
Wrapping up
First time that I have spent several days to cleanup and improve my network, including the setup of a firewall. But it was worth it!
As a non-expert in that domain, I must say that OPNsense is super nice to use, user friendly for a newbie like me but I could also see that it allows more advanced setup. And, of course, it is an OSS!
Tailscale is another nice discovery. I was already using it at work, but I have enjoyed how easy it is to setup my own VPN network.
So, have fun with your own home network!